
Cro Metamask Setup: A Comprehensive Guide
Embarking on the journey of cryptocurrency and blockchain technology can be both exciting and daunting. One of the essential tools you’ll need is a wallet, and one of the most popular wallets in the Ethereum ecosystem is MetaMask. If you’re looking to set up MetaMask for your cryptocurrency needs, you’ve come to the right place. This guide will walk you through the entire process, from installation to using it with the Cronos network.
What is MetaMask?

MetaMask is a browser extension that allows you to interact with the Ethereum blockchain. It serves as a digital wallet where you can store, send, and receive Ethereum and other ERC-20 tokens. With the integration of the Cronos network, you can now use MetaMask to interact with Cronos-based assets as well.
Setting Up MetaMask
Before you begin, ensure that you have the Chrome or Firefox browser installed on your computer. Here’s how to set up MetaMask:
-
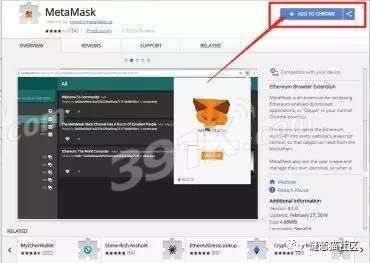
Open your browser and navigate to MetaMask’s website.
-
Click on the “Download” button for your respective browser.
-
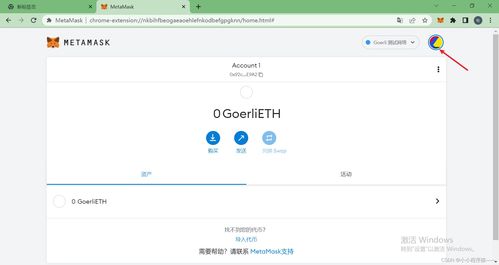
Once the extension is installed, click on the MetaMask icon in your browser’s toolbar.
-
When prompted, click “Get Started” and then “Create a Wallet” to create a new wallet.
-
Follow the on-screen instructions to create a strong password for your wallet. Make sure to write down your seed phrase and keep it in a safe place. This phrase is crucial for recovering your wallet if you lose access to it.
-
After setting up your wallet, you’ll be prompted to choose a name for it. You can choose any name you like.
-
Now, you can start using MetaMask to interact with the Ethereum and Cronos networks.
Adding Cronos to MetaMask
Once you have MetaMask set up, you’ll need to add the Cronos network to it. Here’s how to do it:
-
Click on the MetaMask icon in your browser’s toolbar.
-
Select “Settings” from the dropdown menu.
-
Under the “Networks” tab, click on “Add Network” at the bottom of the list.
-
Enter the following details for the Cronos network:
-
Click “Save” to add the Cronos network to MetaMask.
| Network Name | Cronos |
|---|---|
| Chain ID | 338 |
| RPC URL | https://evm.cronos.org |
| Block Explorer URL | https://cronoscan.com |
Using MetaMask with Cronos
Now that you have the Cronos network added to MetaMask, you can start using it to interact with Cronos-based assets. Here’s a quick rundown of the key features:
-
Storing Cronos-based assets: You can store Cronos (CRO) and other Cronos-based tokens in your MetaMask wallet.
-
Transferring assets: You can send and receive Cronos and other Cronos-based tokens to and from your wallet.
-
Interacting with decentralized applications (dApps): You can use MetaMask to interact with Cronos-based dApps directly from your browser.
Best Practices for Using MetaMask
Here are some best practices to keep in mind when using MetaMask with the Cronos network:
-
Backup your wallet: Always keep a backup of your wallet and seed phrase. This will


